Xenogc Install
A few months ago I decided to attempt a XenoGC wireless install on my cube - It didn't work (as expected:P). I decided to put the cube back. Xeno GC / XenoGC modchip (~$3 on Ebay including shipping). However, it is strongly recommended that you use wires to install it instead,.
I am writing a guide for xeno gc modchipping a gamecube, because there is some info out there that I wasn't able to find while searching, and I had to learn through hours of time wasted. First of all: I buy my modchips off of eBay for $3-8 each.
They are varying clones of the actual xeno chip, but I can verify that they do work. This is much cheaper than pretty much anywhere else you can get them. HOWEVER, please note that the manufacturer uses two red LEDs instead of one red and one orange/green. This means that if you get a red light on your modchip it isn't necessarily broken or installed wrong. On official xenos, the light is supposed to turn orange when it is correctly working, and if it stays red then it means there is a problem. This is NOT the case of these modchips. I went through two of them before realizing that the light is always red, because I couldn't find anywhere this was mentioned.
Microsoft toolkit download. Second of all: every gamecube is different and has a particular 'taste' for mini dvds. Ritek Ridata is the best brand to buy, with about 9/10 of the ones I burn working just fine. I have also used Sony brand (maybe 3/4 of those read), and TDK (where only 1 out of the 10 or so I burned worked). I have also had a gamecube that when chipped would read burned games, but not my official copies.
I thought it was the modchip, but I tested it and the modchip is functioning perfectly in a different 'cube, while a new chip had the exact same issue in that one. There were no bridged points as far as I could tell, and it works normally when not chipped, so I think it's just a freak occurrence.
Maybe other people have had the same issue though. Third of all: I highly highly recommend doing a wired install instead of setting the xeno straight on the board. It makes troubleshooting much easier, and it is nearly impossible to get the chip back off the board without tearing up the testing pads underneath. Osh in serialy online. Even with a tiny soldering tip, it's very easy to bridge connections that way, and very difficult to fix.
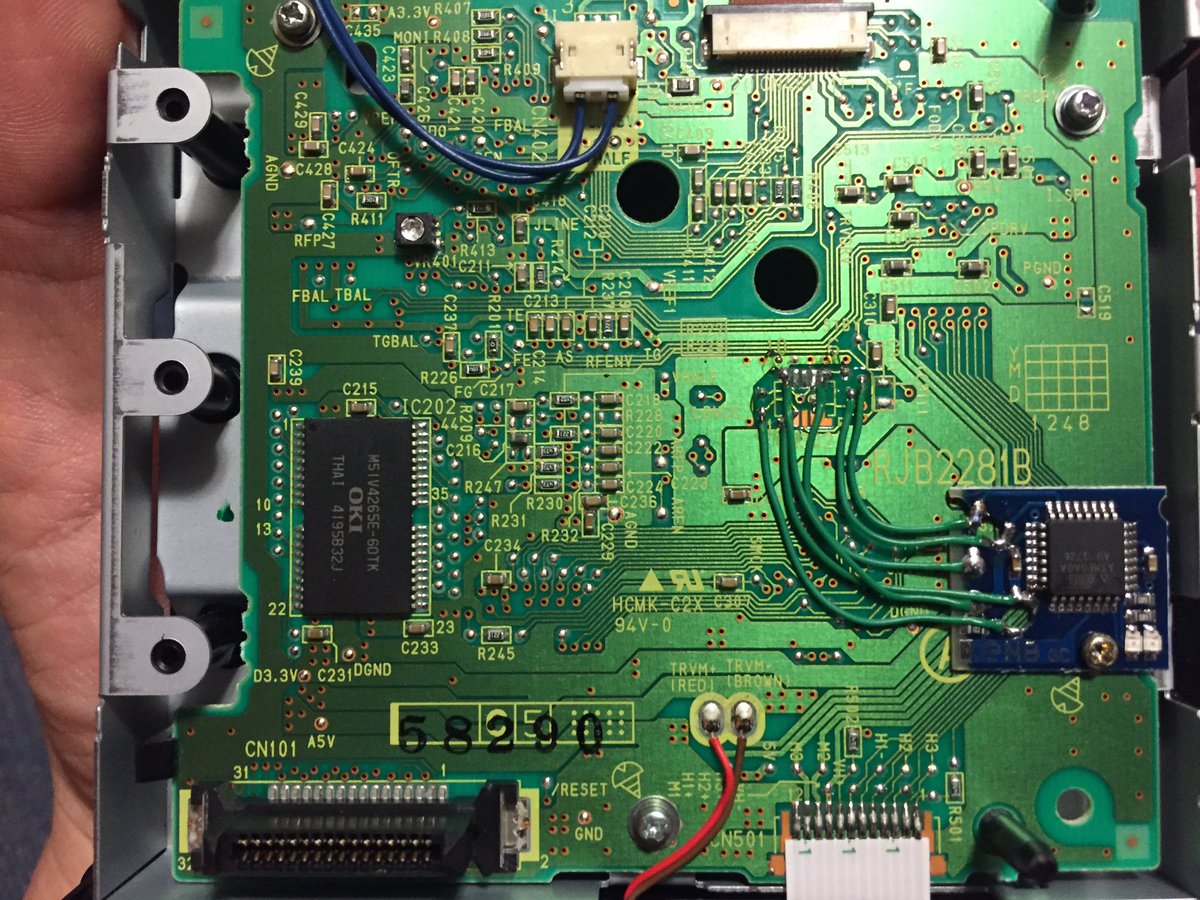
============================ Okay! To the actual instructions! What you'll need: GameCube 4.5mm security screwdriver (to open the gc) Phillips screwdriver Xenogc modchip Soldering iron Small solder Multimeter Small flexible wires Epoxy for plastic (recommended) Electrical tape Step one: Opening the Gamecube. You need a special screwdriver to get Nintendo's weird bolts out of the bottom of the gamecube.
It's possible to melt a pen and essentially mold the plastic to the bolt to get it out, but there's a chance you won't be able to get your gc open if you get melted plastic down there. Plus you need to screw the bolts back down in there afterwards. Attempt at your own risk. Once you remove the four screws holding the main shell on, you can remove the whole top of the gamecube. Unclip the back panel with the av/ power portholes and the front faceplate with the controller ports from their respective posts.